Tuesday, September 25, 2012

Silhouettes Meet Melted Crayons

I really didn't see the big fascination with the melted crayon art craze. I mean, you're taking crayons (GOOD crayons!), taping them up to a white board and hitting them with the heat from your dryer. Ooooooh, cool! Melted colors........whoaaaaaa....Not really.

I saw some okay one's out there and I saw some really ugly shit. Let's not say EVERYTHING everyone makes at home can be called "art". I guess, the exception to the rule is if you're a parent. A majority of you folks think your kids shit gold.

Anyway, I had several examples of some shitty crayon art, but I thought about it and figured that putting up crap that I didn't think was up to par would be the equivalent of me finding of my cakes on Cake Wrecks. Not a good feeling in the pit of my stomach, so for the sake of Karma, I'm not going to blast shitty art.

NOT MY WORK!!! (Just my inspiration.)
This, however, is GORGEOUS. I fell in love as soon as I saw this piece and I was immediately inspired to try this out myself. Take a gander!! Isn't it beautiful? I just want to say that this artist is actually offering custom pieces like this on their Etsy site. If you admire their work, but don't want to get your hands dirty (I can dig that) go check them out and buy something.

I love looking at a picture and being absolutely stunned silent. You can't ask for much more than that, can you? I love stunning silhouettes, and I love sharp color contrasts. And I love rain!!! You can't ask for a better mix of mediums, concepts, techniques, or subject matter!!!

I like doing things myself. I probably won't get it as perfect as this artist has, but half the fun is trying, isn't it?

Materials:
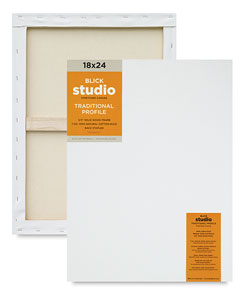
Stretched Canvas.

I think this is a more dramatic piece when you use such a fine board to display your art. Of course, you can use foam board or even just canvas panels, but after doing all this work, why not go all out?
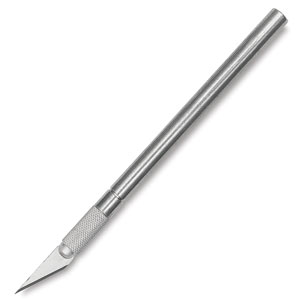
Xacto Knife
Unless you know of a better way to cut out details, this is the way to go.

Glue Gun
I'm sure if you can melt a crayon with a hair dryer, you can melt it with a low-temp glue gun. I happen to have a high temp one. I have several, actually, but the one I was willing to part with was high-temp.
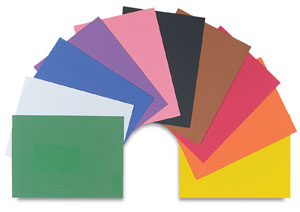
Black Construction Paper
 
Glue- Nothing fancy.
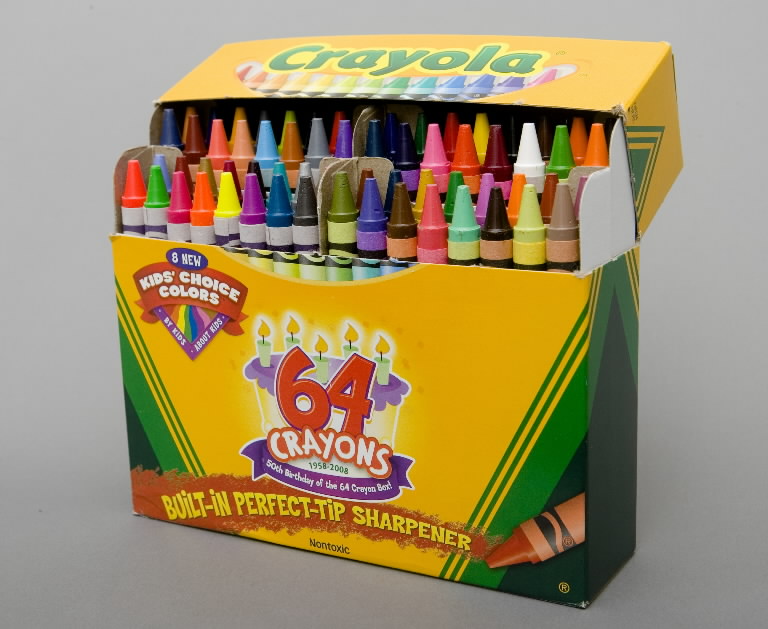
CRAYOLA Crayons
I'm told the cheap crayons don't work well with melty crayon art. Don't skimp on this!!!

A Cute Pic of a Silhouette
(Top left)This is one of my favorite pictures I have. The lighting was off which makes it a poor candidate for enlargements BUT it was such a fun picture I decided the silhouette could be used for something artsy-fartsy. I used Microsoft Picture Manager to adjust the contrast so I could see the silhouette better. (Bottom)

Instructions:

You're going to want to blow up your picture so that that silhouette is at the correct scale in proportion to your canvas. Admittedly, I sort of printed mine smaller than I would have liked. I found the original scale that the artist used on their art piece was very striking. However, after cutting it out with all the details using the Xacto knife, I was sorely reluctant to do it over again. I taped the picture on top of a piece of black construction paper and proceeded to cut it out carefully.....VERY carefully.
At this point, you're gonna wanna do your edits. For example, I gave myself a boob job and a slimmer tummy. Hey, it's MY silhouette!! You can do whatever you like to YOUR silhouette!


I could probably do something artsy with the negative from my silhouette, but it wasn't a perfect cut and I had to tweek my cut-out a little with a pair of very fine, very sharp scissors. I seemed to have cut out my right hand so I decided to add an umbrella to hide the flaw and to give me a reason to "Dance in the Rain" so to speak. I always loved that picture of the couple on the beach with the butler holding the umbrella.  I guess that's kind of my inspiration for this piece. I ended up using this umbrella picture as a general guide. I trimmed it down so it was scaled properly to coincide with my silhouette.


Light Boxes

Some people skip the whole cutting thing by tracing the silhouette onto the canvas and filling it in with a marker. If you want to do that, it's cool. Create your own light box (see picture to the right), tape your original picture to the back of your canvas with the picture pressed up against the back. Set down the canvas on top of the light box and carefully start outlining with a thin market. I don't recommend using a pencil. Pencils usually resist any paint or marker if you try covering over it.

Be careful!!! It's hard to fix mistakes once you're marking up your canvas. You can always reposition your silhouette and cover the mistake with the melted crayon, so you don't have to chuck it and buy another canvas or anything. Just try to be careful to avoid having to worry about it.

Here's a picture of a homemade light box I found online. It's pretty self-explanatory. Just be mindful that the light isn't melting your plastic!


Mounting the Silhouette:


 I glued it on, making sure to not go overboard on the glue. That's it. Too much glue will make your picture wrinkle and hard to handle. Go easy on the glue! I put the original and the silhouette side by side so you can see I wasn't too far off the mark. And the umbrella? I found a nice one online as clipart and I printed it, and cut it out the same way I did the one of me. That was a breeze after spending so much time cutting out the more detailed one.Can you tell I mangled the fingers on my hand "holding" the umbrella? No? Not bad, huh? I guess if you really messed up or want to touch up the silhouette, you can always do little details with a black marker. But, I'm one of those people who will notice the difference in medium and it would just drive me crazy every time I looked at it. I say, it's your art and you should do what feels good to you- even that that means drawing on your canvas directly with a marker!
Here it is; PRE-melted Crayon Rain!

Protect Your Hard Work:


Now that you spent all that time cutting out (or drawing out) your silhouette, you're going to want to protect it from the Crayon Rain. Theoretically, the rain should be dripping off the umbrella rather than just disappearing once it hits, so it was a little difficult for me to figure out how to make that happen. I ended up covering the black construction paper on the canvas with another piece of regular paper cut around the same size, making sure to match the top of the umbrella almost precisely using the Xacto knife. I then used some painters tape less than 1/8th inch bigger than the paper to old it in place. Basically, I covered the paper with painters tape and trimmed away most of it until I had just enough tape to hold it in place. None of the tape touch the black construction paper. (This is important when I explain what happened later.)

Load the Glue Gun:

Just in case it's not clear, you must remove the paper from the crayon before loading your gun. I know other sites glue the paper and crayon onto the canvas and melt that way with a heat gun or a dryer, but that's not what I'm doing here and the paper is an obstacle, not part of the process. The trigger on the glue gun will most likely just push the crayon in and out rather than just in so be prepared to give your crayon a little shove to achieve your effects. I ended up having to use my Xacto knife's back end to get the last bits of crayon through, at times. Push harder to have the wax dibble out faster to get the long runny lines. Hold you gun with the tip facing down and go easy with the trigger if you want a more spotted or dotted effect like rain drops. Also, protect any surface you don't want to get messy. If you prop your canvas up against a wall, protect the wall and the floor beneath it. Crayon is tricky. It can either come up easily or it can be a pain in the ass. Just prevent the disaster before it happens.

Crayon Color Tips:
Whether you're putting plum or purple or violet, if you naked eye can't really tell the difference in the color of the solid crayon (not the drawn color), then the glue gun won't be able to tell either. That means that a trio of dark colors will look like a dark color and will not show the subtle nuances of the slight hints of pink or red that differentiate them. If it looks dark and nearly the same to your naked eye, it will look dark and nearly the same melted on your canvas. Keep that in mind when you plan out your melting strategy. This is my tip; start with the dark colors first. You have a white canvas and the dark colors offer more contrast, plus there are a lot more dark one's in the box. The lighter or brighter colors will pop out more once you have a nice layer of dark dribbles (as I like to call the melted crayon wax). And you can gauge if your picture is turning out too dark or too bright for your taste. Adjust your colors accordingly, breaking up some crayons to save a little for the end just in case a couple of places need a little something.

Where I Went Wrong:
After melting a bunch of crayons and getting a pretty good feeling, I got ansty and peeled off the blue tape and regular paper off my silhouette. It looked amazing with just one dribble making it past the tape and stopping right at the top of my umbrella. Other than that, there was a distinct 1/8th inch white line around the umbrella, where the tape was. I took my canvas and placed it in my lap, grabbed my glue gun and decided I would carefully create the droplets that would hit the umbrella and run off by tilting the canvas myself. The wax was too melty for  me to control and before I knew it, I had a blue streak come straight down my umbrella, over my face, down my body and right off my foot (on the silhouette, I mean). I was pissed, but didn't touch it. It would harden and I could flake it off carefully with the knife. I waited, and then carefully took it off, but I could see the shiny residue where the dribble left it's mark on my matte paper. Deciding that I still needed to keep going with the dribbles on the umbrella, I slapped on the painters tape directly on top of my silhouette (because I was too lazy to cut out a new piece of paper) and trimmed up the umbrella line and went to town on the dribble. I was thoroughly satisfied that I had enough crayon on my canvas, so I started to pull up the tape. And the tape pulled up layers of my construction paper silhouette. =( It wasn't a total disaster, but I could see where the layers were missing. The camera cannot. (At least not from a distance.) Can you see it at all in the picture to the right? It bugged me, but I don't know what I want to do about it yet. I may cut out another silhouette and either cover up the flawed one or replace it. I don't think peeling it off the canvas will work out. I may just leave it and call it my first lesson.
The aftermath. Not too messy, right?

I got an overwhelmingly large response when I showed a few people the finished work. A lot of ooh's and ahh's. Overall, I'd rather teach people who to do this on their own. I have a request or two from a couple of people for me to make one for them. The silhouette is the hardest part and getting enough colors from ONE box of crayons is a little daunting when you're trying to concentrate on one color. I wanted my canvas to consist of mostly purples but after all the shades of purples ran out, I had to throw in some blues and pinks and greys to get the look I wanted. I may do a couple more but on a smaller scale.  I wonder if I will get the same effect?

"I'm Only Happy When It Rains"
OR"
"Pour Your Misery Down On Me"


Wednesday, June 27, 2012

Fifty Shade of 'Oh, Please!'

We all know the frenzy that is Fifty Shades of Grey. I read all three books, and I was underwhelmed. Unfortunately, there are millions of people who disagree with me. But, I suppose that all adage is there for a reason- Different strokes for different folks.

Knowing what the Halloween crazy is like in NYC, I have already been approached by two women for my mask-making skills. Yes, my friends, someone out there (two, actually) are fans of my little mask attempts and have commissioned me to replicate Anasatasia's mask from Fifty Shades Darker.

As you can see from the cover of the book, the mask is longer at the nose and actually comes all the way down to the nostrils. I've never attempted to bend leather into such a detailed shape before, but there's a first time for everything, right?

At the very least, I'm excited to try. I think I'm good enough. I don't think I'm gonna suck. Wish me luck!


And, just to update you on my last project- the Yellow, Green and White puffy crochet blanket; my new nephew Riley was born on June 7th. Meet Riley Chase Rothwell. (Yes, my cousin is all about the resume names.) Unfortunately, his blanket is only halfway complete, but it is summer so by the time the weather cools down, it should be all ready for him!

Tuesday, April 10, 2012

New Baby, New Blanket

I'm off to VA again at the end of the month for my cousin's baby shower. I think handmade gifts are some of the most cherished things anyone can give someone else. Yes, of course I'll buy something off her registry, but I'm going to gift her with this blanket made with my own, two hands!


So, I was sort of following a pattern but quickly went off on my own thing. When you chain, do it in multiples of 9 plus 2. So, do 11 across and do the pattern, then measure to see your gauge. Multiply how ever more you need by 9 to get the proper length, and add 2 to that number. If I'm not mistaken, I think I did 182 across.

Once you have your foundation chain, the extra two you added on is a single crochet. On the next stitch over from the hook, do a double crochet, and then another double crochet in the same stitch. Skip 2, do a single crochet, and then 2 double crochet stitches in the same stitch. Skip 2 and repeat this pattern: 1 Single Crochet and then 2 Double Crochets in the same stitch.

When you get to the end, change 2 (the single crochet stitch) turn your work, and then do two more double crochet stitches in the same stitch. Repeat the pattern across until your blanket is as long as you need it to be. The three stitches should be done in the single crochet stitch in the previous row.

I'm not a pattern writer and I don't follow patterns very well at all. It's hard to keep track and I find it hard to turn when I get to the end. I just try to make my work look consistent. If anyone can write this pattern better, feel free to, and I'll post it and give you due credit! =)

I'm up to about two lengths of the first picture and I'm loving how it's coming out. I hope I can finish this blanket within the next two weeks! I don't have much time.

Thursday, March 29, 2012

Super Mario Crochet Blanket: Nearly Done

The End is NEAR!!!!!!!

The blanket is still in my possession. I need a full picture of the entire thing with the new border I finished up the other night. I also want a pic of my brother when I give it to him so ONE more post till the end! This is my progress this far on this 2 year journey:

TADA: Borderless blanket. 252 granny squares sewn together. This is the blanket hanging up from my shelf above my bed. Pardon the shoddy camera work.


Close-up, Please:


This is the first border I did. It was a double crochet in each stitch all the way around. It started to ruffle and that wasn't the look I was going for.

So, I frogged it:

I did it over again, following the same pattern as the granny squares. It wasn't the look I originally wanted, but it will have to do.

This is the way I originally attached the label. I didn't have any embroidery thread on hand so I tried using some really thin ribbon. It was awful.
The next day I went out and bought some felt, some embroidery thread, and I spent the better part of last night doing this. It took three attempts before I got to this point, and I was tired. I settled for this:

The "This Took Forever" label is courtesy of Sublime Stitching . They are way awesome and I got the label SUPER fast!

Wednesday, March 21, 2012

Craptastic Craft Gifts

Just a short little ditty today.

Just because you took the time out to make something special with your own two hands for a friend or family member, don't assume they are going to appreciate your thoughtfulness, your generosity of time, or the fact that you actually MADE something rather than snapping something off a store shelf.

Whenever I finish a gift, I'm often like that school kid, running home to show someone this work of art that I created, wanting their approval.

But, this is the real world and sometimes friends are just ungrateful assholes. Lesson learned: save the craft gifts for the people who will really appreciate it.

With that being said- my Mario Blanket is one night away from completion and I know my brother will be so excited!

Wednesday, March 14, 2012

The Boobie Beanie!!!!!!

So, I'm going to visit my friend's new baby this Friday and I wanted to bring something no one else has. My crafty netventures have brought up several variations of this boobie beanie. The one woman whom I religiously follow on YouTube actually has a video tutorial and a link to her blog with the written instructions. She did this pattern to promote breast-feeding mothers' rights.My buddy just so happens to be breast feeding her little one.

Luckily, I had the colors on hand and I delved into it last night.

My nipple came out sort of wonky, but the rest of it isn't too bad. I may make another one with a better nipple. And I'll take step by step pictures of my progress.

It's been a long time since I've posted something new. I'm glad I got hit with another bout of insomnia last night. I probably wouldn't have had to time to do this otherwise!


Wonky nipple. =( I should have gone a bit further with the dark pink color.

This is that awesome tutorial I was telling you about, and you can grab her written instructions there.

Sunday, March 4, 2012

Granny Square Super Mario Grid

I received a few requests for a clean excel grid for the pattern for my Super Mario Blanket. (Still nearly done....don't judge me....I've had A LOT on my plate.) So, here's a picture without any of my X's in any of the boxes. It's a total of 252 colored squares.

If anyone wants the actual excel file, just shoot me an email and I'll send it over.

Happy Hooking to you all!!

Wednesday, January 25, 2012

Hello Kitty Cake Pops

While you're all waiting on my Mario Blanket Completion post, why not enjoy a couple of cake pops? =)

I made these off Bakerella's cake pop instructions. She's the Queen of Cake Pops, as far as cake pops are concerned. Look her up and give her some Kudos. She deserves them.

So...PROBLEMS.

The "chocolate" coating is actually a candy chocolate-like coating. Water dare-not touch it or it will seize up and become a gross blob monster- chalky and lumpy. Also, your ban marie cannot be too hot. If the temperature is too hot it will scorch it and seize up and become a blob monster. The instructions on the package says that if it is not liquid enough to stir in a little vegetable shortening...which I did. It didn't help much.

I used left over red velvet cake and some leftover cream cheese frosting. I tossed in a shot of Frangelico for good measure and followed Bkerella's instructions from there as far as cooling, shaping, sticking, and dipping. Like I said, the coating never became completely liquid enough for it to enclose over my cake pop once I had it completely submerged. I stuck it in, and you could still see the cake pop through the hole it created in the coating which was just at the right temp. I had to coax the coating to enrobe the bottom with a stick and then coax it to coat the top just right so that the ears were still visible. I nearly lost a couple of pops that almost came off the stick during the dipping process.

From there, I experimented with a few things to try and get the face just right. Since I didn't have perfectly smooth ovals like Bakerella, it was hard getting a perfect face on there. I tried using mini chocolate chips for the eyes and nose but it looked wrong. I didn't have any of the mini candy coated chips she had on her sight. I painted on the face with food color when it was all said and done, but I had the candy hearts and red hot to make the bow.

I also didn't have any white "chocolate" coating on hand so I had to use the pink, which I thought was fine since this is Hello Kitty, afterall. I actually ate one to try it out. I try to stay away from anything more than a taste in order to avoid being obese, but I wanted to see what the big deal was. It wasn't. I rolled one around in sprinkles to see how a "pretty" one would taste and I didn't like that at all. I think my palate is too sensitive. I could taste the coloring in the sprinkles and it was off-putting.

The best of the bunch.

I used a dot of red icing for her nose on this one.

The good, the bad, and the UGLY.

The Best and the Worst side by side.
You can see the mini choc chips don't make cute eyes.
Materials:

Leftover cake
Leftover frosting
Frangelico
Cookie Dough scoop (to form balls)
Lollipop sticks
Pink Candy Coating
Candy cake decorating hearts
Red Hot
Black Gel Food Color
Drop of whiskey (to thin food coloring)
Small Paint Brush

You can buy all this stuff (except the cake, frosting and liquor) at any local craft store like Michaels, AC Moore, or Jo-An.