Just a short little ditty today.
Just because you took the time out to make something special with your own two hands for a friend or family member, don't assume they are going to appreciate your thoughtfulness, your generosity of time, or the fact that you actually MADE something rather than snapping something off a store shelf.
Whenever I finish a gift, I'm often like that school kid, running home to show someone this work of art that I created, wanting their approval.
But, this is the real world and sometimes friends are just ungrateful assholes. Lesson learned: save the craft gifts for the people who will really appreciate it.
With that being said- my Mario Blanket is one night away from completion and I know my brother will be so excited!


Wednesday, March 21, 2012

Wednesday, March 14, 2012
The Boobie Beanie!!!!!!
So, I'm going to visit my friend's new baby this Friday and I wanted to bring something no one else has. My crafty netventures have brought up several variations of this boobie beanie. The one woman whom I religiously follow on YouTube actually has a video tutorial and a link to her blog with the written instructions. She did this pattern to promote breast-feeding mothers' rights.My buddy just so happens to be breast feeding her little one.
Luckily, I had the colors on hand and I delved into it last night.
My nipple came out sort of wonky, but the rest of it isn't too bad. I may make another one with a better nipple. And I'll take step by step pictures of my progress.
It's been a long time since I've posted something new. I'm glad I got hit with another bout of insomnia last night. I probably wouldn't have had to time to do this otherwise!


This is that awesome tutorial I was telling you about, and you can grab her written instructions there.
Luckily, I had the colors on hand and I delved into it last night.
My nipple came out sort of wonky, but the rest of it isn't too bad. I may make another one with a better nipple. And I'll take step by step pictures of my progress.
It's been a long time since I've posted something new. I'm glad I got hit with another bout of insomnia last night. I probably wouldn't have had to time to do this otherwise!


 | ||
| Wonky nipple. =( I should have gone a bit further with the dark pink color. |
Sunday, March 4, 2012
Granny Square Super Mario Grid
I received a few requests for a clean excel grid for the pattern for my Super Mario Blanket. (Still nearly done....don't judge me....I've had A LOT on my plate.) So, here's a picture without any of my X's in any of the boxes. It's a total of 252 colored squares.
If anyone wants the actual excel file, just shoot me an email and I'll send it over.
Happy Hooking to you all!!

If anyone wants the actual excel file, just shoot me an email and I'll send it over.
Happy Hooking to you all!!

Wednesday, January 25, 2012
Hello Kitty Cake Pops
While you're all waiting on my Mario Blanket Completion post, why not enjoy a couple of cake pops? =)
I made these off Bakerella's cake pop instructions. She's the Queen of Cake Pops, as far as cake pops are concerned. Look her up and give her some Kudos. She deserves them.
So...PROBLEMS.
The "chocolate" coating is actually a candy chocolate-like coating. Water dare-not touch it or it will seize up and become a gross blob monster- chalky and lumpy. Also, your ban marie cannot be too hot. If the temperature is too hot it will scorch it and seize up and become a blob monster. The instructions on the package says that if it is not liquid enough to stir in a little vegetable shortening...which I did. It didn't help much.
I used left over red velvet cake and some leftover cream cheese frosting. I tossed in a shot of Frangelico for good measure and followed Bkerella's instructions from there as far as cooling, shaping, sticking, and dipping. Like I said, the coating never became completely liquid enough for it to enclose over my cake pop once I had it completely submerged. I stuck it in, and you could still see the cake pop through the hole it created in the coating which was just at the right temp. I had to coax the coating to enrobe the bottom with a stick and then coax it to coat the top just right so that the ears were still visible. I nearly lost a couple of pops that almost came off the stick during the dipping process.
From there, I experimented with a few things to try and get the face just right. Since I didn't have perfectly smooth ovals like Bakerella, it was hard getting a perfect face on there. I tried using mini chocolate chips for the eyes and nose but it looked wrong. I didn't have any of the mini candy coated chips she had on her sight. I painted on the face with food color when it was all said and done, but I had the candy hearts and red hot to make the bow.
I also didn't have any white "chocolate" coating on hand so I had to use the pink, which I thought was fine since this is Hello Kitty, afterall. I actually ate one to try it out. I try to stay away from anything more than a taste in order to avoid being obese, but I wanted to see what the big deal was. It wasn't. I rolled one around in sprinkles to see how a "pretty" one would taste and I didn't like that at all. I think my palate is too sensitive. I could taste the coloring in the sprinkles and it was off-putting.
Materials:
Leftover cake
Leftover frosting
Frangelico
Cookie Dough scoop (to form balls)
Lollipop sticks
Pink Candy Coating
Candy cake decorating hearts
Red Hot
Black Gel Food Color
Drop of whiskey (to thin food coloring)
Small Paint Brush
You can buy all this stuff (except the cake, frosting and liquor) at any local craft store like Michaels, AC Moore, or Jo-An.
I made these off Bakerella's cake pop instructions. She's the Queen of Cake Pops, as far as cake pops are concerned. Look her up and give her some Kudos. She deserves them.
So...PROBLEMS.
The "chocolate" coating is actually a candy chocolate-like coating. Water dare-not touch it or it will seize up and become a gross blob monster- chalky and lumpy. Also, your ban marie cannot be too hot. If the temperature is too hot it will scorch it and seize up and become a blob monster. The instructions on the package says that if it is not liquid enough to stir in a little vegetable shortening...which I did. It didn't help much.
I used left over red velvet cake and some leftover cream cheese frosting. I tossed in a shot of Frangelico for good measure and followed Bkerella's instructions from there as far as cooling, shaping, sticking, and dipping. Like I said, the coating never became completely liquid enough for it to enclose over my cake pop once I had it completely submerged. I stuck it in, and you could still see the cake pop through the hole it created in the coating which was just at the right temp. I had to coax the coating to enrobe the bottom with a stick and then coax it to coat the top just right so that the ears were still visible. I nearly lost a couple of pops that almost came off the stick during the dipping process.
From there, I experimented with a few things to try and get the face just right. Since I didn't have perfectly smooth ovals like Bakerella, it was hard getting a perfect face on there. I tried using mini chocolate chips for the eyes and nose but it looked wrong. I didn't have any of the mini candy coated chips she had on her sight. I painted on the face with food color when it was all said and done, but I had the candy hearts and red hot to make the bow.
I also didn't have any white "chocolate" coating on hand so I had to use the pink, which I thought was fine since this is Hello Kitty, afterall. I actually ate one to try it out. I try to stay away from anything more than a taste in order to avoid being obese, but I wanted to see what the big deal was. It wasn't. I rolled one around in sprinkles to see how a "pretty" one would taste and I didn't like that at all. I think my palate is too sensitive. I could taste the coloring in the sprinkles and it was off-putting.
 |
| The best of the bunch. |
 |
| I used a dot of red icing for her nose on this one. |
 |
| The good, the bad, and the UGLY. |
 |
| The Best and the Worst side by side. You can see the mini choc chips don't make cute eyes. |
Leftover cake
Leftover frosting
Frangelico
Cookie Dough scoop (to form balls)
Lollipop sticks
Pink Candy Coating
Candy cake decorating hearts
Red Hot
Black Gel Food Color
Drop of whiskey (to thin food coloring)
Small Paint Brush
You can buy all this stuff (except the cake, frosting and liquor) at any local craft store like Michaels, AC Moore, or Jo-An.
Friday, December 30, 2011
Crochet Mario Blanket: The End Is Near
I'm sorry I haven't posted recently. It's my busy season and my crochet time has been limited, at best. I did not make my Christmas deadline. I made a few mistakes stitching together my squares, and had to frog the fuck out of this blanket several times already. Imagine having to rip out entire rows of squares because the stitches are uneven or mismatched? That's what comes when you stitch together squares when you're half asleep. Anyway, here are some of the pictures I've promised, along with my current progress. I will not say when this blanket will certainly be done because I don't want to jinx myself. Just know that I'm getting close.
 |
| So, I had all the horizontal lines done like you see above, but the vertical lines have not been stitched at all yet. This was Xmas Eve. |
 |
| I started stitching, and this is what it looks like from behind. Not bad, huh? Pretty neat and tidy. |
 |
| This is what the front looks like. See? Even with the thread color switches, you can't see the color of the thread I'm using to stitch this together, which means I wasted a whole lot of time switching from color to color. Since I started that way, I had to stay consistent. I also discovered another trick. I went out and bought 4 more needles. I have the different colors already assigned to a needle so I'm not changing out thread as needed. Duh!! Why didn't I do that to begin with? |
 |
| Pardon the shitty image or the amateur special effects, but I took the pic hastily while it was spread out across my very mess bed so I had to try and crop out the laundry and junk all over my bed. But, this is what my blanket looks like right now. I have two vertical rows stitched already with 11 more to go, and maybe a finished crochet border along the outside in the denim color. Ugh. =( |
Thursday, November 17, 2011
Crochet Mario Bros. Blanket: A Stitch in Time
...will take me forever!!!!
Here is the first 6 rows of my Mario Bros. Blanket stitched together. I only have one picture so far to document my progress. I've added on a couple more rows since. I've had to "frog" this piece a few times already for stitching the wrong side, stitching the wrong direction, or stitching on the wrong color. Frogging, my cousin Lilia tells me, is a crochet/knitting term which refers to ripping out completed rows or stitches because you messed up. "Rip it! Rip it!" Get it? Frogging. Think about it....
Tonight, I'll take another shot of my progress, as well as some close-ups of the back stitches so you can see how I'm putting this all together. I'll also take pictures of the problematic areas so you know the downside of stitching it the way I chose to.
I realized I like reading blogs with more pictures depicting what the heck the blogger is talking about. I'll try and do more of that so you can appreciate where I'm coming from. It's frustrating and slow, but I am happy it's taking shape and I will be super-proud when this is all done.
Oh, and the pic above is just a partial view. So far, this blanket is 14 squares across. He's going to have a pretty substantial blanky when this is all said and done!
Here is the first 6 rows of my Mario Bros. Blanket stitched together. I only have one picture so far to document my progress. I've added on a couple more rows since. I've had to "frog" this piece a few times already for stitching the wrong side, stitching the wrong direction, or stitching on the wrong color. Frogging, my cousin Lilia tells me, is a crochet/knitting term which refers to ripping out completed rows or stitches because you messed up. "Rip it! Rip it!" Get it? Frogging. Think about it....
 | ||
| Do you see Mario's face coming through? |
I realized I like reading blogs with more pictures depicting what the heck the blogger is talking about. I'll try and do more of that so you can appreciate where I'm coming from. It's frustrating and slow, but I am happy it's taking shape and I will be super-proud when this is all done.
Oh, and the pic above is just a partial view. So far, this blanket is 14 squares across. He's going to have a pretty substantial blanky when this is all said and done!
Sunday, November 13, 2011
Granny Squares Completed

This is what 252 completed granny squares look like. I am so relieved to be done with this. Now, I just have to stitch them back together. Since I have the flu and a four-day weekend, it looks like my blanket will be done by the end of today. I sorta want to do a finishing border stitch all the way around like my cousin Lilia did to her awesome afghan. We'll see if I can manage that today. I'm feeling like a hot mess right now. I have the flu...again. =( I don't know why I've been getting sick so easily the last few years, but maybe it's time to get checked out.
Still, I'm glad I'm nearing the end of this project. Next up is DOLL MAKING!! I think it will be a lot of fun! And my brother is going to love his Xmas present! (This blanket, not the doll.)
Tuesday, November 1, 2011
A Wrench in the Machine
Well, the good news is that all 256 of my crocheted granny squares for my Mario Bros blanket is all completed. The bad news is that they are sitting in three shoe boxes, held hostage in my former residence. I don't know when I'll be able to go back and rescue my crafts.
I can't even tell you whether I'm going to stitch them together using a yarn needle or crochet them together using a smaller hook. I have no clue. Well, I'll keep you all informed on the state of my poor never-finished blanket. =(
I can't even tell you whether I'm going to stitch them together using a yarn needle or crochet them together using a smaller hook. I have no clue. Well, I'll keep you all informed on the state of my poor never-finished blanket. =(
Tuesday, October 4, 2011
WIP: Mario Blanket- Hit RESET
Well, folks. After viewing my options yesterday at my nearest yarn barn, and after discussing it with my very learned Jewish yarn guru / store owner, I decided to put aside all 35 Water Chestnut squares I crocheted in the Patton's Classic and save it for another use. I bought 4 skeins of Blossom in Wool Ease, instead.
That mean's I'll have to re-crochet the 35 I already made plus the remaining 8 that I needed to do. It sets me back a few days, but honestly, even though I love the feel of 100% wool, it will felt and get all fuzzy as time goes by (which is fine) but all the other 200+ squares I made will not. So, Mario's skin will look like it has some disease while the rest of him will look like the wool/acrylic blend that I've been using on the majority of the rest of the blanket.
Blossom is more on the pink side, rather than the peach side. Paton's has the advantage on the color I was trying to go for since NO ONE has peach except Red Heart, and we all know how I feel about Red Heart. (YUCK!) But, Blossom comes pretty close and it will match the texture of the rest of the blanket, which is more important. I hope this works!! Wish me luck, people!
Now, I'm back to 43 squares away from completion! Hey, it's been nearly 2 years! I can live with that!
That mean's I'll have to re-crochet the 35 I already made plus the remaining 8 that I needed to do. It sets me back a few days, but honestly, even though I love the feel of 100% wool, it will felt and get all fuzzy as time goes by (which is fine) but all the other 200+ squares I made will not. So, Mario's skin will look like it has some disease while the rest of him will look like the wool/acrylic blend that I've been using on the majority of the rest of the blanket.
Blossom is more on the pink side, rather than the peach side. Paton's has the advantage on the color I was trying to go for since NO ONE has peach except Red Heart, and we all know how I feel about Red Heart. (YUCK!) But, Blossom comes pretty close and it will match the texture of the rest of the blanket, which is more important. I hope this works!! Wish me luck, people!
 |
| This is Blossom. |
Monday, October 3, 2011
Mario Blanket Hold-Up
So close.....and yet so far. I have 8 flesh colored squares left to crochet before the mise-en-place portion of my blanket is completed!!!
And I ran out of my Paton's Water Chestnet pale pink yarn. I took it for granted that I could find almost any yarn at the Fabric store across the street from my job, but upon further inspection, my yarn color was not in stock. Further to my dismay, I found a similar color in the Lion Brand Worsted Weight Wool that I've been using on the rest of the blanket!! The color was Blossom.
I'm so friggin' aggravated! I just wanted to have this blanket done sooner rather than later so that I could move on with my craft projects. It looks like I'll have to order it online.
=(
Bummer.
And I ran out of my Paton's Water Chestnet pale pink yarn. I took it for granted that I could find almost any yarn at the Fabric store across the street from my job, but upon further inspection, my yarn color was not in stock. Further to my dismay, I found a similar color in the Lion Brand Worsted Weight Wool that I've been using on the rest of the blanket!! The color was Blossom.
I'm so friggin' aggravated! I just wanted to have this blanket done sooner rather than later so that I could move on with my craft projects. It looks like I'll have to order it online.
=(
Bummer.
Monday, September 26, 2011
Nearly Finished Granny Square Mario Blanket
Hey, you guys!!!!!!
I am just 24 flesh colored squares away from completion!! Well, then comes to the daunting task of joining them all up, but my Mario Blanket is nearly finished!

I am just 24 flesh colored squares away from completion!! Well, then comes to the daunting task of joining them all up, but my Mario Blanket is nearly finished!

Tuesday, September 20, 2011
Blinged Out Wedding Pumpkins
Any one who knows me knows how much I LOVE glittering the heck out of everything! I couldn't be happier when my bride-friend told me that she wanted glittered pumpkins as a part of her centerpieces. We went to a farm to pick up a bushel of pumpkins. (I will add more photos to this post later. I can't find my camera cable right now.) I had taken some pictures at the farm.
 Anyway, this is a bushel of pumpkin gourds, which is what they officially call these mini pumpkins. WeeBee pumpkins are actually small, round pumpkins; smaller than a regular pumpkin, but larger and rounder than a pumpkin gourd. A bushel has nearly 60 mini pumpkins inside. And, they sold it to my friend's fiance for $24 which is an absolute STEAL!
My friend too this picture of the bushel. We had already taken out nearly 45 at this point. About 32 of them were good, and nearly 10 were either dented, missing stems, or not cute enough for the wedding. Still, though, she has nearly another 40 or 50 in there, and she only needed about 50 to begin with!!
 After running out of glitter and time, this is what she had. The wedding isn't until the 30th of Oct, so she's storing these in a flat plastic container and laying it flat on a rack.
We messed around with centerpiece ideas. We settled on 4 different colored pumpkins laying outside of a round mirrored tray with tea lights and a small round vase with cut Gerber daisies in fall colors. I didn't take pictures since it was only a trial run. I'll take pics of the actual centerpiece.

My friend too this picture of the bushel. We had already taken out nearly 45 at this point. About 32 of them were good, and nearly 10 were either dented, missing stems, or not cute enough for the wedding. Still, though, she has nearly another 40 or 50 in there, and she only needed about 50 to begin with!!
 After running out of glitter and time, this is what she had. The wedding isn't until the 30th of Oct, so she's storing these in a flat plastic container and laying it flat on a rack.
 We messed around with centerpiece ideas. We settled on 4 different colored pumpkins laying outside of a round mirrored tray with tea lights and a small round vase with cut Gerber daisies in fall colors. I didn't take pictures since it was only a trial run. I'll take pics of the actual centerpiece.
Wedding / Bridesmaids Crafty Goodness
 It's not the first time I made these bridal pumpkins for Fall Weddings. The first time I did it, it was for the bridal party for my friend's Halloween Bachelorette party. Had I been with a more adventurous group of girls, it would have been more fun, but alas....My pumpkins were awesome, though!
 That picture was taken YEARS ago! It was my fat phase...How ironic that I'm back where I started. =/ You can't really tell from the picture, but there's barbed "wire" with tiny spiders wound around the tulle.
Considering my friend is having her wedding the day before Halloween and a lot of her decor is bourderline Thanksgiving/Halloween, I took it upon myself to design the goodies for the bachelorette party. As if I'd let anyone else take that way from me!!
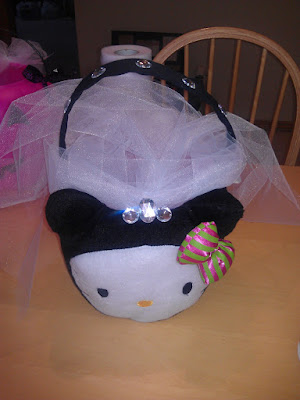 |
| She's a big Hello Kitty fan, so imagine my excitement to find this little gem in Target! The gems and tulle totally made the Hello bucket more bridal. |
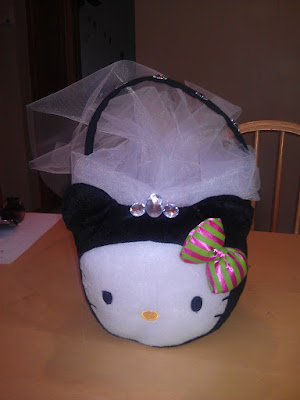 |
| I think it was cute all on it's own. |

 |
| The bride-to-be was QUITE happy with it! |
Not to be left out, I put these together for the bridal party. I'm part of that little group!   |
Sunday, September 11, 2011
WIP: Crochet Mario Bros. Blanket - We Have a Problem!
Hey, happy hookers!
On my last Mario Bros Blanket update, I mentioned that I had issues finding the correct color yarn for his peachy/pink skin in the Lion Brand Wool Ease blend that I've been using for the rest of the blanket. I finally consented and bought Red Heart Classic yarn in light peach.
That was scraping the bottom of the barrel when it comes to yarn. It's cheap, it's acrylic, and it sort of burns my fingers when I'm crocheting quickly. In desperation, I bought 6 skeins of it. After completing the last of the chocolate brown squares, I pulled out one of these skeins and immediately felt the difference in texture and weight. I did one granny square and realized this wasn't going to work. LOOK:
 My flash sort of messed up the shot, but you can see the size difference of a square crocheted from the same pattern with the two different yarns. The Red Heart brand is bigger, and less pleasing to the touch. This won't work if they're all going to be joined up to form one huge blanket.
I need to crochet 43 of these little peach squares, and I'm not going to do it with the wrong yarn only to find out at the end that none of those squares will work out. It will take me about 3 days to do it; three days I'll never get back if I go one using the wrong material.
Back to the drawing board, I'm afraid. I'm going back to the craft stores to search again for something in the Wool Ease brand that may do or even Vanna's Choice. I'm not going to let my 2 year-long project go to shit because of ONE color!
On my last Mario Bros Blanket update, I mentioned that I had issues finding the correct color yarn for his peachy/pink skin in the Lion Brand Wool Ease blend that I've been using for the rest of the blanket. I finally consented and bought Red Heart Classic yarn in light peach.
That was scraping the bottom of the barrel when it comes to yarn. It's cheap, it's acrylic, and it sort of burns my fingers when I'm crocheting quickly. In desperation, I bought 6 skeins of it. After completing the last of the chocolate brown squares, I pulled out one of these skeins and immediately felt the difference in texture and weight. I did one granny square and realized this wasn't going to work. LOOK:

I need to crochet 43 of these little peach squares, and I'm not going to do it with the wrong yarn only to find out at the end that none of those squares will work out. It will take me about 3 days to do it; three days I'll never get back if I go one using the wrong material.
Back to the drawing board, I'm afraid. I'm going back to the craft stores to search again for something in the Wool Ease brand that may do or even Vanna's Choice. I'm not going to let my 2 year-long project go to shit because of ONE color!
Tuesday, August 30, 2011
WIP: Granny Square Super Mario
Well, look where we are! It's nearly the end of August and this neverending blanket is yet to be finished. I ran into some issues. The peachy skin color is not available in the worsted weight Lion Brand Wool Ease yarn that I've been using for all the other colors. Even turning to Vanna's Choice (or whatever that other brand is) proved to be fruitless. I had to get the peach color from Red Heart, which is the crappy yarn. I hope my brother doesn't spill anything on this blanket because washing it may prove to be a problem.
I'm still down two skeins of chocolate brown yarn. It had been out of stock during the colder months, so I had turned my attention to the denim blue, which is in lieu of the sky blue color Super Mario Bros is so well known for. Oh, well. I have to make due with what's available to me!
Here is my progress so far. It looks like I'm more than halfway through!! Woohoo!!!!

Need Done Left
Blue: 108 80 28
Brown: 54 30 24
Red: 45 45 0
Yellow: 2 2 0
Flesh: 43 0 43
Wow, look at all those X'd out boxes!!
I'm still down two skeins of chocolate brown yarn. It had been out of stock during the colder months, so I had turned my attention to the denim blue, which is in lieu of the sky blue color Super Mario Bros is so well known for. Oh, well. I have to make due with what's available to me!
Here is my progress so far. It looks like I'm more than halfway through!! Woohoo!!!!

Need Done Left
Blue: 108 80 28
Brown: 54 30 24
Red: 45 45 0
Yellow: 2 2 0
Flesh: 43 0 43
Wow, look at all those X'd out boxes!!
Thursday, August 11, 2011
Old School Mario Bros DS Cake
I made this cake a couple of years ago for a customer who wanted a Nintendo DS shaped cake but with an Old School Mario scene from the very first game on the original NES. This is what I came up with. Granted, it's not the BEST DS shaped cake ever made. He didn't want much cake. He was more interested in the scene on the screen.
Most definitely one of the most fun cakes I have EVER made. It took me about 5 hours from start to finish.


My shaped cakes have come a looooong way since then! Still, you never forget your learning projects. I learned a lot from this one. I can't draw very well. So, I used shapes instead to get the picture just right! Cute, no?
Most definitely one of the most fun cakes I have EVER made. It took me about 5 hours from start to finish.


My shaped cakes have come a looooong way since then! Still, you never forget your learning projects. I learned a lot from this one. I can't draw very well. So, I used shapes instead to get the picture just right! Cute, no?
Materials:
Two 11" x 7" butter cakes
Strawberry filling
Vanilla Buttercream
Wilton Fondant
Food Coloring
Thursday, June 2, 2011
WIP: Granny Square Super Mario
I haven't updated my craft blog in a while, but that's mainly because I haven't completed any crafts recently. I've been crocheting up a storm, but not as fast as I would have liked. Lack of time is a big factor in that.
However, my Mario blanket is well on its way to completedness!
Done: 126
Blue: 49
Brown: 30
Red: 45
Yellow: 2
That leaves 126 left to go! I'm at the halfway point!! Wooo-f'ing-Hooo!!!
However, my Mario blanket is well on its way to completedness!
Done: 126
Blue: 49
Brown: 30
Red: 45
Yellow: 2
That leaves 126 left to go! I'm at the halfway point!! Wooo-f'ing-Hooo!!!
 |
| This is my Excel visual of my progress so far. There's so much more to finish! =( |
 |
| It occurred to me that maybe I should show you all that I'm actually crocheting something, and not just thinking about it! These are my squares. I keep them in my Nike shoebox. Shoeboxes are the bomb! |
Wednesday, May 18, 2011
PacMan Lovin'
I know, I know. I like to keep my cake creations on my cake site: Queenie Cakes. However, I'm so tickled that these came out so great, I can't help but brag about it on my craft blog.
Chocolate Fudge cupcakes topped with fondant decorations.

Chocolate Fudge cupcakes topped with fondant decorations.

Monday, May 9, 2011
WIP: Crochet Mario Bros. Blanket
This poor bastard of a project has been a work in progress for nearly a year. It consists of 252 crochet granny-squares. The breakdown is as follows:
Blue:108
Brown: 54
Red: 45
Yellow: 2
Flesh: 43
This is what's done as of right now:
Yellow: 2
Red: 45
Brown: 22
Which means I have an ass-ton more to go! Ugh. This is my Excel grid of what's done. I'm hoping to finish within a month or two. I'm still in search for the elusive Flesh-toned color. It's been hard to find in a worsted weight wool blend. I'll find it, though!

Blue:108
Brown: 54
Red: 45
Yellow: 2
Flesh: 43
This is what's done as of right now:
Yellow: 2
Red: 45
Brown: 22
Which means I have an ass-ton more to go! Ugh. This is my Excel grid of what's done. I'm hoping to finish within a month or two. I'm still in search for the elusive Flesh-toned color. It's been hard to find in a worsted weight wool blend. I'll find it, though!

Monday, May 2, 2011
Crochet Basket
This basket was supposed to be a blanket. I had not picked up a crochet hook in over two years and was eager to get back into it. I bought two skeins of purple soft-touch yarn and went to town, chaining about 200 and then doing some weird double crochet stitch on every other one. I don't know what I was doing, but it started to ruffle. Everyone who saw it laughed and said my blanket would be uneven and weird looking, not to mention the enormous holes that my wonky pattern was creating. When my two skeins were done, I had a long 6 inch wide strips of "netting". What was I going to do with that? I wound it around and around in a spiral, crocheting it all together and creating this basket. I chained up a rope and made a tie to keep the top cinched. I use it to hold my hats and winter gloves now. =)
When life hands you a wonky, ill-prepared "blanket", make a fucking basket and throw your odds and ends in there!
Ta-DA!
Supplies / Sources:
Soft Touch Yarn in Amethyst: Michaels
When life hands you a wonky, ill-prepared "blanket", make a fucking basket and throw your odds and ends in there!
Ta-DA!
 |
| It would have been a very holey blanket anyway. |
 |
| This is my basket cinched up at the top. |
 |
| I use it as a hat holder now. |
 |
| This is my basket on top of my pillow to give you an idea how big it is. It's pretty substantial. |
Supplies / Sources:
Soft Touch Yarn in Amethyst: Michaels
Monday, April 18, 2011
When Bad Masks Happen
...to good people.
This mask was going to be a mardis gras work of art! However, falling behind on my baking and running short on time (once again), I ended up rushing it and I absolutely hated how the paint job came out. HATE. I added a gold-painted dowel as the handle after the pictures were taken. The woman I gave it to loved it, and didn't believe I made it. She was still a hit at her party, though, with this one-of-a-kind mask.
Not my best work, but even the duds should be documented! This only goes to prove that you can't put lipstick on a pig!


 Materials & Sources:
8oz vegetable tanned leather: Tandy Leather
Liquitex Acrylic Paints gold & purple - Pearl Paint (NYC)
Feathers & Plastic Jewels: Pearl Paint (NYC)
This mask was going to be a mardis gras work of art! However, falling behind on my baking and running short on time (once again), I ended up rushing it and I absolutely hated how the paint job came out. HATE. I added a gold-painted dowel as the handle after the pictures were taken. The woman I gave it to loved it, and didn't believe I made it. She was still a hit at her party, though, with this one-of-a-kind mask.
Not my best work, but even the duds should be documented! This only goes to prove that you can't put lipstick on a pig!


8oz vegetable tanned leather: Tandy Leather
Liquitex Acrylic Paints gold & purple - Pearl Paint (NYC)
Feathers & Plastic Jewels: Pearl Paint (NYC)
Wednesday, March 30, 2011
Halloween Pumpkins 2011
Because my blinged out pumpkins came out so great the year before, I wanted to step it up this past Halloween. I was a bit ambitious this time around. I'll tell it with pictures...
Materials:
Various sized pumpkins
Cutting & etching tools
White glue
Hot glue gun
Glitter puffy paint pens
Martha Stewart Glitter in silver, onyx, & glow-in-the-dark (which DID NOT glow-in-the-dark-or-otherwise)
Chopsticks (to hold on the carriage wheels)
Tealights and small electric lights
Cinderella's Carriage
 |
| My nekid pumkins. Two of them were from Southampton! |
 |
| I started etching in the carriage door. |
 |
| Then, the right carriage window. |
 |
| Followed by the left carriage window. |
 |
| TA-DA! |
 |
| Oh, man...What a mess! |
 |
| I embellished the outside with puffy glitter paint. |
 |
| Pretty, isn't it? |
 |
| Every carriage needs some wheels! |
 |
| This was supposed to be glow-in-the-dark glitter. MARTHA STEWART LIED!! |
 |
| See? No glow-in-the-dark action! Bastards... |
 |
| But, they were sparkly...crystal-like. |
 |
| Some glitter on the doors to make them pop. |
 |
| My disassembled carriage. |
 |
| I popped those wheels on with chopsticks & a little hot glue. |
 |
| With the aide of a hammer. |
 |
| My carriage awaits! (Daylight hours.) |
 |
| And here it is at night! |
Karma-saurus
 |
| We start off with a monster of a pumpkin and cut into it's head. |
 |
| Hollow it out. |
 |
| Give him some eyes and a nose. |
 |
| ...and a mouth. |
 |
| ARRRRRRRRGH! "I'M ALIVE!!!!" |
 |
| Pop in the props! |
 |
| Karma's a Bitch! |
 |
| Impressive, no? |
 |
| Throw in a small electric light. |

 |
| "MUAHAHAHAHAHAHA!" |
 |
| I done good! |
 |
| >=] |
 |
| Now, that's a fancy stoop! |
 |
| My craft babies! The striped one on the far right is done up with white glue and glitter. |
Various sized pumpkins
Cutting & etching tools
White glue
Hot glue gun
Glitter puffy paint pens
Martha Stewart Glitter in silver, onyx, & glow-in-the-dark (which DID NOT glow-in-the-dark-or-otherwise)
Chopsticks (to hold on the carriage wheels)
Tealights and small electric lights
Subscribe to:
Posts (Atom)